Water damage is a common problem that many homeowners face, and it can lead to expensive repairs if not addressed in time. One of the best ways to protect your home is by using sealed flashing. This is simple yet essential feature helps prevent water from seeping into vulnerable areas of your house. Here, we will explain everything you need to know about sealed flashing.
What is Sealed Flashing?
Flashing is a thin material used in building to stop water from getting into joints or openings. Additionally, sealed flashing involves sealing these materials at the edges and overlaps to make them completely waterproof. Consequently, this creates a strong barrier against moisture, keeping your home safe and dry.
Sealed flashing is commonly used in areas such as:
- Roof valleys
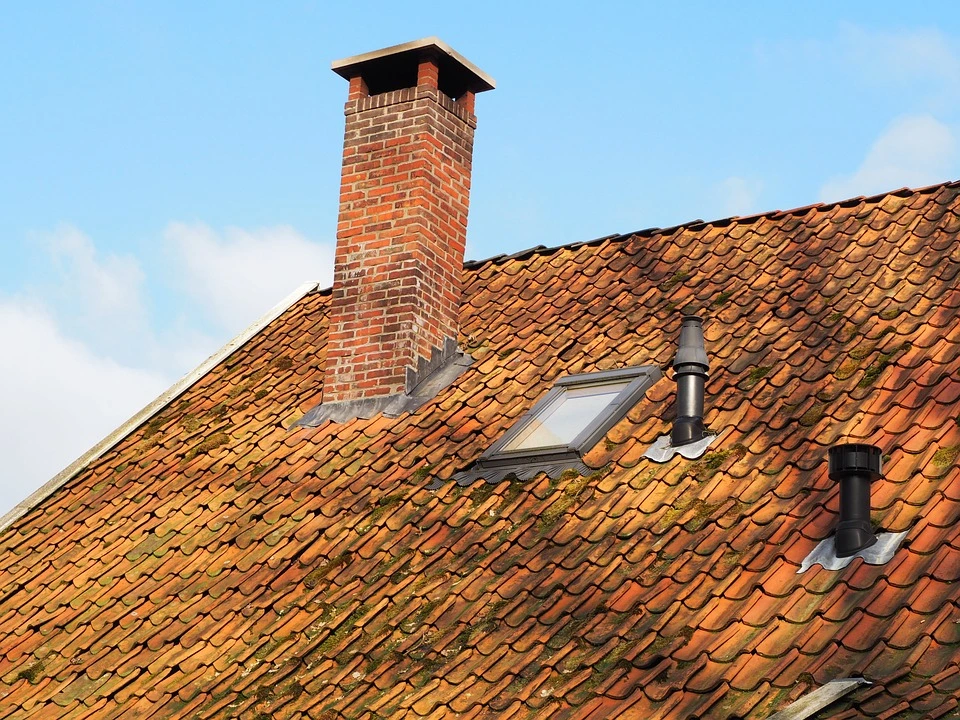
- Around chimneys
- Edges of skylights
- Around windows and doors
- Junctions between walls and roofs
By sealing the flashing, you reduce the chances of water leaking into your home and causing damage.
Why is Sealed Flashing So Important?
Water infiltration can weaken the structure of your home, cause mold growth, and lead to costly repairs. Here’s why sealed flashing is a must:
- Prevents Water Leaks: It stops water from entering areas where it could cause damage.
- Increases Durability: Proper sealing ensures your home’s materials last longer by preventing rot and rust.
- Improves Insulation: Sealed flashing reduces drafts and helps maintain consistent indoor temperatures.
- Saves Money: Proactively installing sealed flashing can save you from expensive repairs in the future.
Types of Flashing Materials
Choosing the right flashing material is essential to ensure it works effectively for your home. Here are the most popular materials:
Aluminum Flashing
Aluminum is lightweight, affordable, and resistant to rust. It’s easy to cut and shape, making it ideal for most residential projects. However, it may not be suitable for areas with high levels of alkaline exposure.
Copper Flashing
Copper is very strong and has a unique look. Contractors often use it in high-end projects, but it can be more expensive than other materials.
Galvanized Steel Flashing
This type of flashing is coated with zinc to prevent rust. As a result, it’s strong and commonly used for roofs. However, proper sealing is essential to keep it from corroding over time.
Rubberized Asphalt Flashing
Rubberized asphalt is flexible and adheres well to most surfaces. It’s a modern material that is easy to install and provides excellent waterproofing.
Vinyl Flashing
Vinyl is a budget-friendly option that resists rust and corrosion. People commonly use it around windows and doors, but it may not be as durable as metal options.
Key Areas That Need Sealed Flashing
To keep your home fully protected, it’s important to install sealed flashing in these critical areas:
Roof Valleys
Roof valleys are where two roof slopes come together. They often collect large amounts of water, so sealed flashing is crucial to direct the flow safely.
Chimneys
Without proper flashing, water can seep into the gaps between your chimney and roof, causing leaks and structural damage.
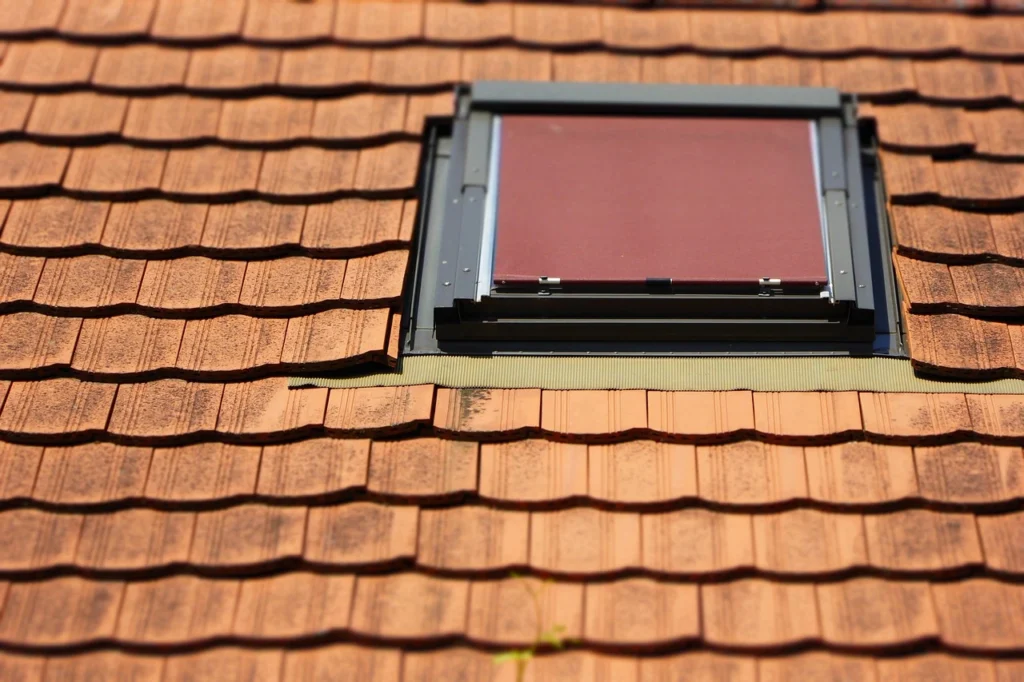
Skylights
Skylights are a great source of natural light but can also be prone to leaks. Sealed flashing stops water from leaking around the edges.
Windows and Doors
Flashing around windows and doors helps prevent drafts and water damage. Additionally, sealing the flashing ensures a tight, waterproof fit.
Decks and Balconies
Where decks or balconies meet the walls of your home, sealed flashing is essential to prevent water from getting inside.
How to Install and Seal Flashing Correctly?
Installing sealed flashing requires careful preparation and attention to detail. Here is a step-by-step guide:
Step 1: Choose the Right Material
The first step is selecting the flashing material that best suits your needs. For example:
- Aluminum: Lightweight and rust-resistant, ideal for general use.
- Copper: Durable and good-looking, but costs more.
- Rubberized Asphalt: Excellent flexibility and adhesion for irregular surfaces.
Choose a material that aligns with your budget and environmental conditions.
Step 2: Prepare the Surface
Before installation, ensure the surface is:
- Clean: Remove any dirt, dust, or debris.
- Dry: Moisture can hinder adhesion, so make sure the area is completely dry.
- Smooth: Ensure the surface is level and free from cracks to allow the flashing to adhere properly.
Step 3: Measure and Cut the Flashing
- Check the area where you’ll install the flashing.
- Cut the flashing material to size using tin snips or a utility knife.
- Leave extra material for overlaps, as these are crucial for waterproofing.
Step4: Position the Flashing
- Place the flashing in the desired location, ensuring it covers the joint or opening completely.
- For areas like roof valleys or chimneys, position the flashing so water flows away from the structure.
- Overlap sections by at least 2 inches to create a seamless barrier.
Step 5: Apply Sealant
- Use a high-quality waterproof sealant or adhesive.
- Apply the sealant to all edges and overlaps of the flashing.
- Smooth the sealant with a putty knife to ensure complete coverage and avoid gaps.
Step6: Secure the Flashing
- Attach the flashing to the structure using nails, screws, or adhesive, depending on the material.
- Place the fasteners at regular intervals to ensure a tight fit.
Step 7: Test for Leaks
- Once the installation is complete, test the area by spraying water over it.
- Check for any signs of leakage and address them immediately by adding more sealant or adjusting the flashing.
Step 8: Final Inspection
- Check the flashing to make sure it’s aligned and sealed properly.
- Ensure all edges are securely fastened and no gaps are left.
- Clean up excess sealant for a neat finish.
Maintenance Tips for Sealed Flashing
To keep your sealed flashing in good condition, follow these maintenance tips:
- Inspect Regularly: Check your flashing twice a year for cracks, gaps, or signs of wear.
- Clean Debris: Clear away leaves, dirt, and other debris that can hold moisture and cause damage.
- Reapply Sealant: Apply new sealant if the old one has worn off over time. Reapply it as needed to maintain a waterproof barrier.
- Fix Damage Quickly: If you notice any damage, repair it promptly to avoid bigger problems.
Should You DIY or Hire a Professional?
Installing sealed flashing can be a DIY project for small areas like windows or doors. However, for complex areas such as chimneys or roof valleys, it’s best to hire a professional. They use their skills and equipment to make sure the job is done right.
The Importance of Building Codes
Building codes often require flashing and sealing in specific areas to protect against water damage. Therefore, make sure to follow these regulations to ensure your home remains safe and compliant.
FAQs
What is the best sealer for flashing?
The best sealer for flashing is a high-quality, waterproof sealant such as silicone or polyurethane. These sealants provide excellent adhesion and long-lasting protection against moisture.
What type of flashing is best?
The best flashing type depends on how it will be used. For general use, aluminum or galvanized steel are great choices due to their durability and affordability. Copper is ideal for high-end projects because of its aesthetic appeal and long lifespan.
Is flashing waterproof?
Yes, flashing is designed to be waterproof when properly installed and sealed. The sealing process ensures that no water can penetrate through joints or overlaps.
What is the best sealant for flashing windows?
Silicone sealant is often the best choice for flashing windows due to its flexibility, durability, and excellent waterproofing properties. It sticks well to most surfaces and doesn’t crack over time.
What is the best sealant for chimney flashing, including metal chimneys?
For chimney flashing, including metal chimneys, experts highly recommend using polyurethane or elastomeric sealants. These sealants provide a strong, flexible bond that can withstand temperature fluctuations and weather conditions.
What is Flash Seal elastomeric flashing sealant?
Flash Seal designers created it as a premium elastomeric sealant specifically for sealing flashing. It delivers high durability, waterproofing, and flexibility; therefore, it is perfect for installing on chimneys, roofs, and other areas where flashing is used.
Conclusion
Sealed flashing is a simple but effective way to protect your home from water damage. By carefully choosing the right materials, installing them correctly, and maintaining them over time, you can effectively keep your property safe and avoid costly repairs. Whether you decide to tackle the project yourself or hire a professional, prioritizing sealed flashing is a smart move that will pay off in the long run. Your home deserves the best protection, and sealed flashing provides exactly that.